Addendum II
“How to Organize Physical Archives in 10 Steps”
Marc Drouin
Introduction
This guide presents a 10-step process for organizing documents related to human rights violations and transitional justice. It is intended for civil society organizations that have little to no archival experience or that have never tried to salvage and organize the documents they have accumulated over many years of work. Organizations that already have a physical or digital archive will have completed most, if not all, of the suggestions proposed here.
The 10 steps correspond to three basic themes: the first is very practical and corresponds to the staff, space, and materials needed to organize the documents (steps 1 through 5); the second is more theoretical and requires thinking about document categories and subcategories that will provide the final archive with a logical structure (steps 6 through 8); and the third section addresses creating an inventory describing each document in the archive and providing basic treatment for the conservation of each document (steps 9 and 10).
Since every archive is unique, the 10 steps are merely suggestions that can be followed to organize a basic physical archive prior to the digitization of documents, a phase that follows the process proposed below. If the 10 steps are followed and all the documents in the physical archive are organized, then digitization can be carried out in the same order. Therefore, it is important to understand that any document in a physical archive must be organized, described, and stored in suitable conditions before creating a digital version, whether it will be used for the organization’s own purposes or for public disclosure.
Before implementing the 10 steps, we recommended assembling the following supplies, equipment, and staff:
- A team of two or three people responsible for carrying out the archival process;
- Personal protective equipment, such as gowns or oversized long- sleeved shirts, masks, latex or lint-free cotton gloves, hair nets or caps;
- Cleaning materials for the workspace;
- A dry, clean, well-lit, ventilated workspace;
- Worktables, chairs, and shelves that are painted or made of stainless steel;
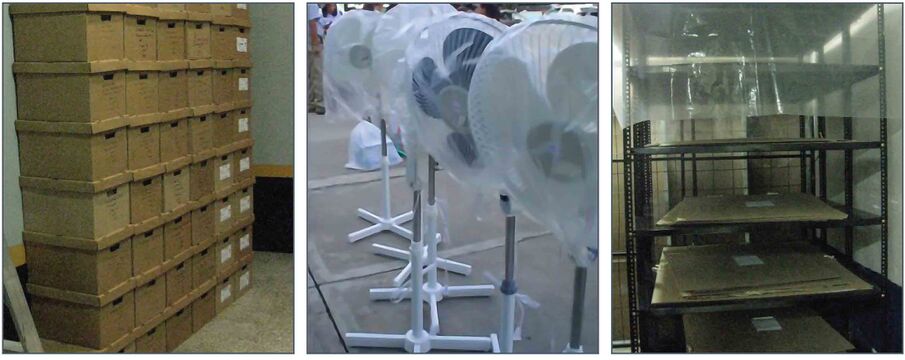
- One or two fans (only if no spores are found on the documents);
- Cardboard boxes with lids for organizing and storing documents;
- Post-it labels/sheets of paper, tape, markers, and stainless-steel staples;
- Legal size manila folders;
- Reams of acid-free paper in letter, legal, and oversized formats;
- 1-centimeter wide twill tape (sold in rolls by the meter);
- Reams of chipboard;
- A paper cutter and/or scissors and Exacto knife;
- A metal ruler or T-square (in centimeters or inches);
- Plastic paper clips;
- Brush with soft, natural bristles (not plastic);
- Letter opener or lab spatula to remove staples (do not use staple removers);
- At least one workstation with a computer with Excel software.
STEP ONE: FORM A TEAM
From the moment a human rights organization makes the decision to create and maintain an institutional archive, a team will be charged with fulfilling this new goal. Because it includes sensitive information that can compromise the safety of victims, witnesses, and/or their families, the organization, protection, and safekeeping of the archive is a responsibility that goes beyond the mere preservation and administration of documents.
For this reason, the archive team may include members of the organization’s board of directors who provide general guidance; staff that will carry out the organization and preservation of the documents; and trusted external consultants who provide specific technical and professional advice and skills as the archival process progresses. At the end of the document organization process, together, these individuals will ensure the maintenance and integrity of the archive in the longer term.
The team may vary in number depending on the available budget, the size of the organization, and the volume of documents to be organized. In some cases, it is possible to appoint one or two people to manage the process. In continual consultation with other members of the organization, the team will make decisions regarding archive content, purchasing materials, and hiring specialized personnel when necessary.
Organizations with limited resources can seek the support of other organizations with previous archival experience or set up agreements with academic institutions to have students work at the archive as interns. As the archive grows, the organization can train some of its members to carry out more specialized work for the administration and eventual digitization of its contents.
Initially, the team will lead a process to salvage and safeguard documents that, due to a lack of resources, staff or space, may have been previously stored in a makeshift or disorderly manner. The goal here is to build a team that has the technical capabilities and ethical responsibility to create and maintain the archive.
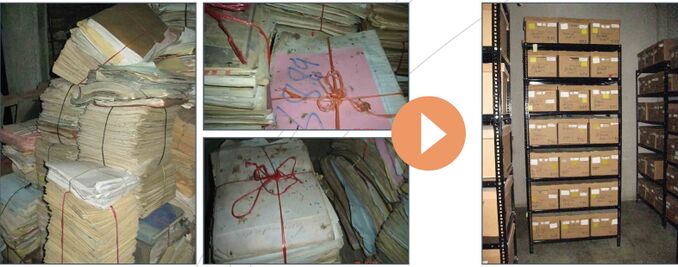
The archive team will have to make important decisions regarding the criteria for selecting materials to be preserved and archived. Although organizations often want to preserve all of their materials because they all seem valuable, it is often not reasonable or sustainable to do so , as some materials may be duplicated or do not provide relevant information about the organization, its history, or its activities. In addition, it might be too expensive or impractical, in terms of the space and equipment required for long-term storage, to keep all the materials. These are important decisions that must be made by the team in charge of organizing and maintaining the archive.
STEP TWO: LOCATE THE MATERIALS
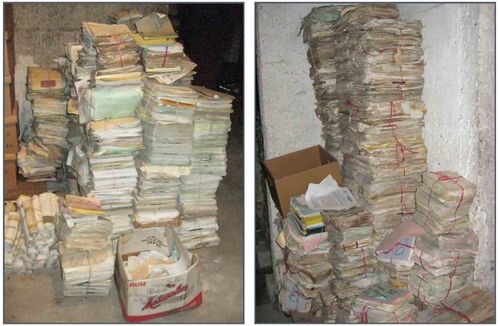
Over the years, organizations produce a large number of documents in the course of their operations and activities. As the volume of documents grows, the materials are often stored in inappropriate places to create space for more current documents or for those that are used on a daily basis. In many organizations, older documents are tied into bundles or kept in bags or boxes and stored in empty rooms, closets or storage spaces where they are exposed to moisture, heat, and pests. When an organization moves its offices, sometimes it takes these bundles of materials to its new location, distributes them among members of the organization, or gives them to other groups with the hope that one day they will be organized and preserved.
During this step, it is important to locate all the organization’s scattered materials and set up an appropriate space for their centralization, organization, and preservation.
STEP THREE: FINDING A SUITABLE WORKSPACE
The workspace must offer protection from the elements in order to avoid any further physical damage to the documents. Even though this space may not be the one where the archive is eventually stored, it is needed at this time to centralize the documents and begin to review and organize them. This space must be clean and dry, free of pets and pests, and have little traffic. This is where the initial organization of the documents will begin and the process of identification, cleaning, organization, and preservation will be carried out. Ideally, the space should be properly lit and ventilated, furnished with worktables and shelves, and have doors that allow for controlled access to the documents.
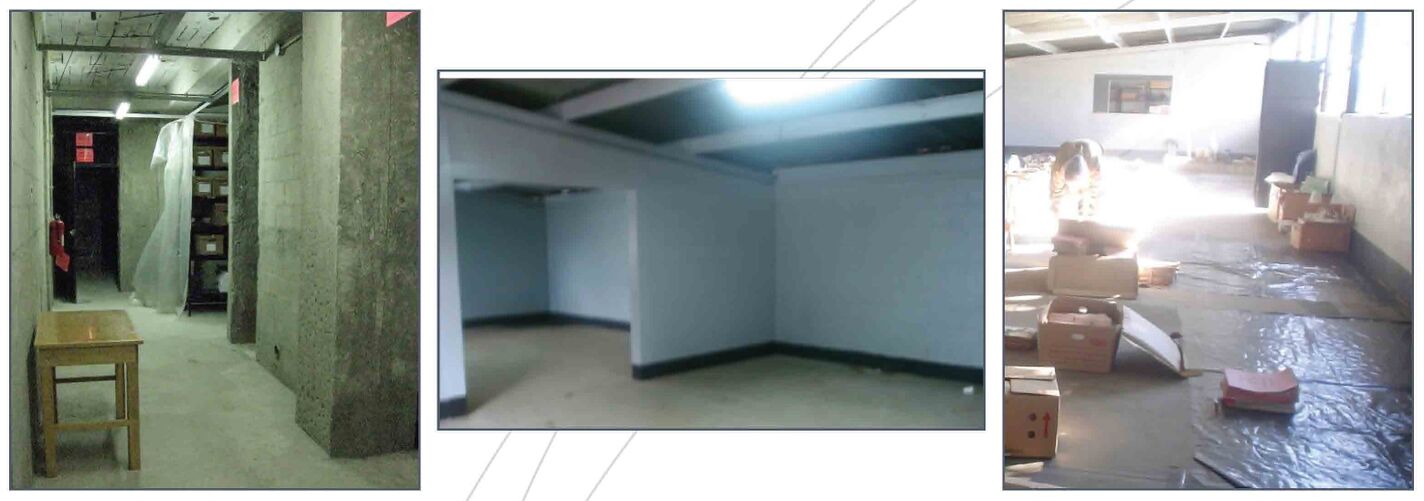
In particularly arid, humid, or dusty environments, we recommend the workspace be equipped with hermetically sealed windows and doors. It is important to avoid dirt or carpeted floors because they can be very damaging to documents. When possible, the color of the floor should allow dust particles to be easily seen so that regular cleaning can be done more easily and effectively.
If the space permits, one or more fans can ensure adequate ventilation. However, the use of fans should be avoided if the documents contain spores or fungi, in which case the moving air could spread the spores around the space and thereby harm staff, the integrity of the documents, or both. If an air conditioner is used, it must have a mechanical filter that can be changed frequently. Finally, the consumption of food and drink in the workspace should be prohibited to prevent damage to documents during handling. In addition, food and drink remnants can attract insects that might further damage and degrade the documents.

STEP FOUR: GETTING THE DOCUMENTS OFF THE GROUND
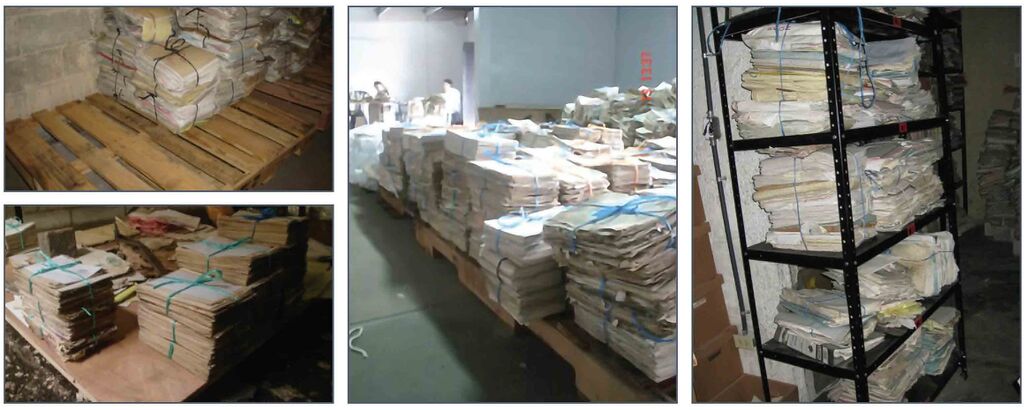
From the start, it is very important that the documents and materials to be organized are not directly in contact with the floor or walls. This reduces the possibility of contact with moisture or dust. In the very short term, you can use prefabricated platforms, build makeshift platforms with bricks and wooden boards, or use moisture-resistant plastics to cover the floor where the documents will be collected. In the medium and long term, ideally, you should use painted or stainless-steel shelves to ensure the preservation of the documents, as materials such as wood can attract moisture and termites, which are very harmful to paper documents. However, what is important at this point of the process is to provide a first level of protection for the materials that previously may have been exposed to unsuitable storage conditions.
STEP FIVE: PROCURE BASIC MATERIALS
Once the work team has located a suitable space to gather the documents to be archived and the documents are elevated off the ground and moved away from the walls, basic materials and furniture can be acquired for their initial organization. Worktables, chairs, shelves, and cardboard or plastic boxes will be needed at this point to organize the documents.
For the team members in charge of the archive, it is also important to acquire and use personal protective equipment such as masks, smocks or oversized long-sleeved shirts, latex gloves, hair nets or caps, as well as cleaning products and insecticide for the workspace.
A document stored in humid environments and extreme temperatures is likely to be infested with fungus, mold, and/or pests that deteriorate the document itself and threaten the health of the archivists. Although the protection and conservation of the documents is important, the health and welfare of staff must be the highest priority before, during, and after any archival process.


STEP SIX: DEFINITION OF GENERAL ARCHIVAL CATEGORIES
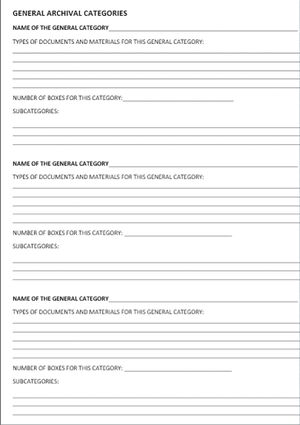
During this step, team members will consider how best to group documents together according to general classification categories. These general categories will reflect the need for creating the archive in the first place, while respecting the original purpose of the documents and their use in the past.
Identifying general categories is key to successfully organizing the archive. General categories provide an initial structure for document organization and their
location in the archive. These categories may not necessarily be the only ones that will be used, but they will get the process started.
The general categories can reflect an organization’s work areas or divisions. Depending on the organization, it may have an “Administration and Coordination Area,” a “Communications Area,” a “Training and Education Area,” a “Research Area,” a “Legal Area,” a “Project Area,” etc.
As part of their past activities, each of these work areas or divisions created and used documents, and these are the documents that now need to be organized and preserved in the archive. For this task, the organization’s structural chart indicating its different work areas can help staff visualize the organization of the archive.
Archive team members may find it useful to draw a structural chart for the organization beginning with when it was founded and show how this structure has changed over time. The work areas of an organization may provide the necessary criteria to identify and define the archive’s general categories.
There are also other general categories that can be used to organize archival documents, but the examples that follow in this guide will refer to an organization’s structure by work areas to identify its archive’s general categories.
General categories group documents that have something in common. The point of this step is not to describe each document, but rather to give the collection of documents a preliminary order that facilitates the following steps in the archival process.
At this point, it is important that the archive team create an initial list of general categories and, in the next steps, notes the different types of documents that are part of each general category.
The worksheet illustrated here, for example, can be used to identify and list general categories, as well as the various materials included in them and their amounts. Once the different general categories of the archive have been defined, they will be compiled on a single list.
STEP SEVEN: INITIAL ORGANIZATION OF THE DOCUMENTS
In this step, the documents and other archival materials are reviewed in order to classify them. This initial classification will make use of the general categories defined in the previous step and the documents and other materials will be placed in cardboard or plastic boxes. At the end of this step, all the documents in the archive will be grouped into boxes according to their general category.
At this time, the bags will be opened and the bundles of documents untied to determine their content. For this purpose, the team will use large worktables or a clean, plastic-coated floor, and it will need a sufficient number of cardboard or plastic boxes with lids and a space with shelves to store the boxes in an orderly manner. It is important throughout this and all other steps of the archival process that team members wear personal protective equipment, particularly gloves and masks, when working with archival documents.
During this step, you will encounter various documents: copies of legal files, press releases, payrolls, lists of members, minutes of board meetings, books, account statements, etc. The idea here is to classify these materials according to each work area of the organization that created and used them. This way, the documents created and used by a work area constitute a general category. In archival terms, this general category then becomes a documentary series.

Paper documents are likely to be loose or stapled and may have been placed in manila or plastic folders, ring binders, etc. If they are grouped in any way, at this time, you should not individualize and describe each document stored in a folder or binder, but rather place the folder or binder in a general category.
At this point of the process, you will likely encounter both letterand legal-size sheets of paper, and it is also possible that you will encounter other materials that contain information, such as photographs, floppy disks, hard drives, memory cards, audio and video cassettes, posters, maps, recognition plaques, etc. If possible, organize these materials in the same way as the others in the appropriate general category (even though their later handling may be different). If these materials do not have a label or other indications regarding their content, they must be set aside and mechanical or computer equipment must be found that can read or reproduce the information they contain.
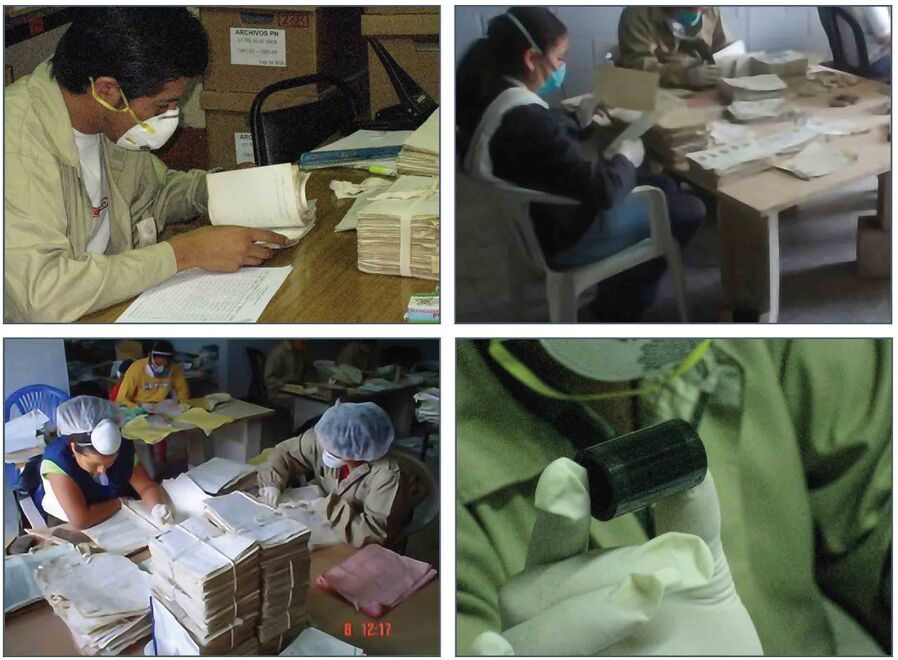
Once a document has been reviewed, it is placed in a labeled box. The label can be a sheet of paper taped onto the outside of the box indicating the following information: the name of the organization, the general category of the documents in the box, the consecutive number of the box in that category; and the bookend years of the documents (in other words, the year of the oldest document and the year of the most recent document in the box ). You can also include a brief description of the contents of the box, such as “paper documents,” “video cassettes,” “floppy disks,” etc., as well as the general condition of the materials.

You might consider putting paper documents in one box and other types of materials, such as photographs, floppy disks or video cassettes in a separate box. Even though all these boxes belong to the same general category, the types of materials may be different. Another box must also be designated for materials in the same general category that are damaged or that require particular attention due to their condition.
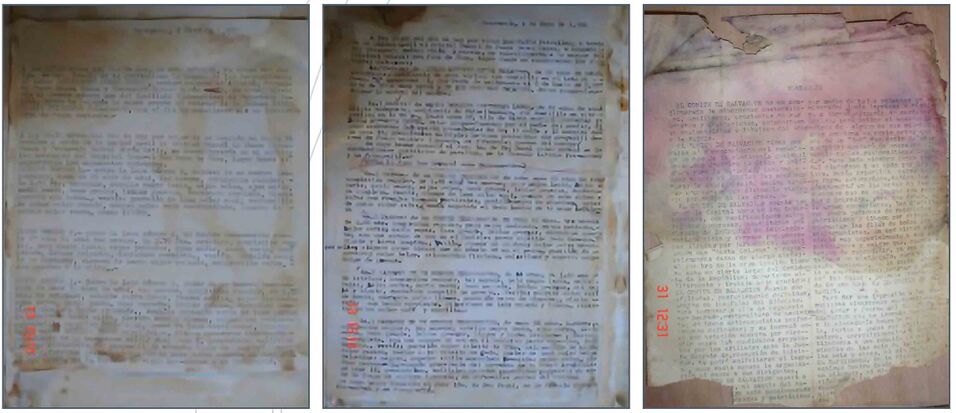
Storing documents in poor conditions can result in damage and loss of information. Therefore, every document in the archive must be handled with care, observing its physical condition and looking for any indication of damage. Such damage is usually biological or mechanical and, in general, is caused by light, humidity, and/or temperature. For example, light can discolor documents and weaken the fibers of the paper; humidity can generate spots and stains where dust and dirt accumulate; and high temperatures can encourage the growth of spores and fungi and attract insects.
Biological damage refers to living organisms such as rodents, insects, fungi, and bacteria that can destroy documents. Some of these, including cockroaches, worms, termites, and ants, consume the paper while breeding in a damp, dark environment. Their presence can be identified by small holes appearing on the pages or by droppings left between the documents. Spores, fungi, and bacteria change the texture of the paper and weaken it. Their presence is evidenced by the appearance of black, reddish, or brown stains on the paper. A magnifying glass can be used to differentiate an acid stain from fungus., Fungi are superimposed on top of the paper and, in some cases, have thin bristles.
Mechanical damage refers to the breakup of paper fibers or the impact of oxidation from metallic elements such as staples, clamps or clips. Also, the hardening or crystallization of adhesive tape used to repair a torn piece of paper can further tear or stain paper. Plastic elements, such as transparent or colored folders, damage documents due to their acidity and by encouraging humidity buildup. Mechanical damage is also caused by the tension on the paper due to bindings, clamps or presses, such as in classification binders. This tension is evidenced by tears, cracks, and the overall weakening of the paper.
Finally, damaged documents need particular attention. Temporarily, they should be kept in a box labeled “Damaged Materials.” The label should also include other information about the general category to which they belong. Any indication of the presence of rodents, insects, fungi, or bacteria on or among the documents also indicates the need to regularly fumigate – in the absence of staff – the space where these documents are stored and handled.
After the documents have been reviewed and sorted into general categories, the archive team will have groups of boxes that correspond to the general categories of the archive. If possible, the boxes should be stored on stainless steel or painted wooden shelves. If shelves of this type are not available, the boxes can be temporarily stored on top of each other, taking care that no box is in direct contact with the ground and the weight of the upper boxes does not damage the lower boxes.
Before moving on to the next step, it is important that all archival materials are first classified into general categories. It is also important not to mark or write directly on the original documents. You should not repair tears with adhesive tape or add post-its or other similar items intended to highlight interesting information or documents. To preserve the integrity of the documents, we recommend keeping a record of the documents of interest in a notebook or other format that allows for their easy location and retrieval in the future.
In the list of general categories that was created in the previous step, the number of boxes that were filled for each general category is now indicated, as well as the total number of boxes for all categories. If, during the review and classification process, the team added or removed general categories, now is the time to update the list of general categories and the number of boxes that correspond to each.
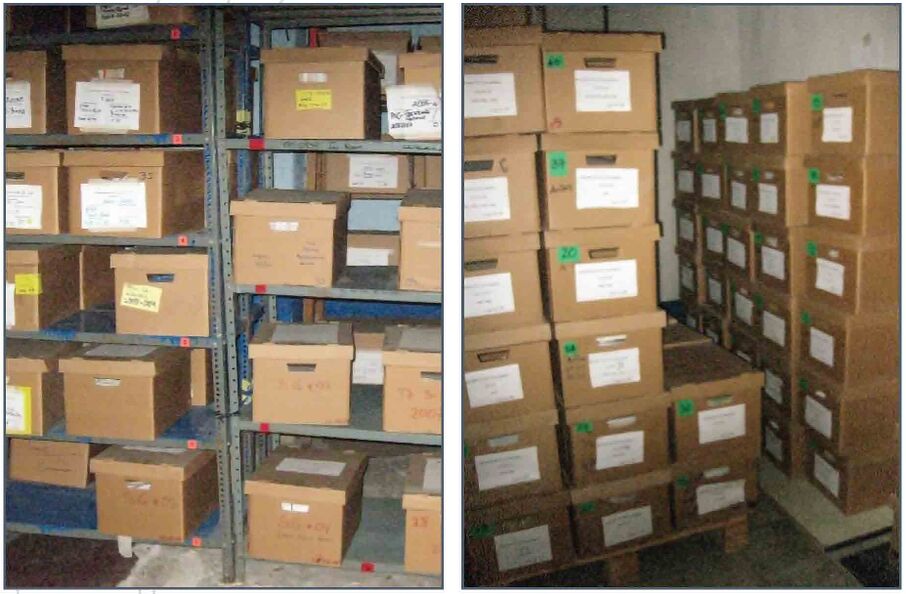
The shelves on which the archives are stored should be away from the walls and the documents should never touch the floor. This prevents any further damage to the documents from water leaks or any accidental spills in the storage space or facility.
STEP EIGHT: IDENTIFICATION OF DOCUMENTARY SUBCATEGORIES OR SUBSERIES
At the beginning of this step, the archive team can prioritize the general categories they want to inventory and preserve first. For example, due to legal considerations or ongoing investigations, the team may decide to work with the “Research Area” general category first, rather than documents from the “Administration and Coordination” work area.
Once the team has decided how to prioritize the general categories for processing, it will then move on to this step for the first general category and the contents of its respective boxes. This first general category of collected materials constitutes the first documentary series of the final archive.

Since you will spend a fair amount of time working with and revising each document in the first general category or documentary series, it is important to have worktables, chairs, and fans —assuming there are no spores or fungi on the documents— to ensure good air circulation in the workspace. Tables, chairs, and the workspace should be cleaned frequently, and team members should use personal protective equipment (particularly gloves and masks) when handling documents. If smocks or loose-fitting shirts are used as cover-ups, they should be washed and dried frequently.
The goal of this step is to inspect and briefly describe all the collected documents and materials included in the first general category or documentary series and organize them into more specific subcategories or subseries. Subcategories generally refer to the types of documents contained in a general category. For example, in the general category from the “Communications Area,” you will find press releases, recordings of radio or television programs, photographs, press materials, pamphlets, flyers, posters, publications, video recordings, etc.
To better organize the various documents, these can be grouped into different subcategories, such as “Press Releases,” within the general category “Communications Area.” If the general subcategory is “Press Releases,” then these can be organized chronologically, by year and by month, starting with the oldest releases going to the most recent; or thematically, according to the different topics of the releases organized in alphabetical order by topic, and then chronologically, by year and by month.
Taking the general category “Communications Area” as an example, the subcategories can be organized according to the different types of documents, such as “Press Releases,” “Posters and Flyers,” “Press Clippings,” “Publications,” etc. The relationship between the general category and its documentary subcategories can be illustrated as follows:
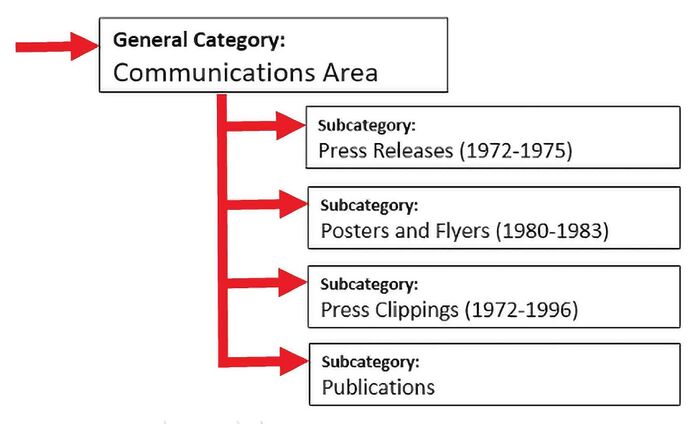
As the illustration indicates, all the documents related to the Communications Area are gathered in a single general category and the subcategories, identified according to document types or their function, allow them to be better organized in an orderly and logical manner.
What are subcategories?
When opening the boxes of materials from the first general category, the team will encounter various documents, such as those already mentioned, as well
as different types of materials such as cassettes, photographs, posters, etc. Therefore, a general category can have one or more secondary categories based on the types of materials it contains. These can be organized into subcategories, with the number of subcategories depending on the diversity of the materials and how many subcategories the archive team deems necessary to organize a general category.
In this way, each general category or documentary series is made up of one or more subcategories or documentary subseries. This can be illustrated as follows:
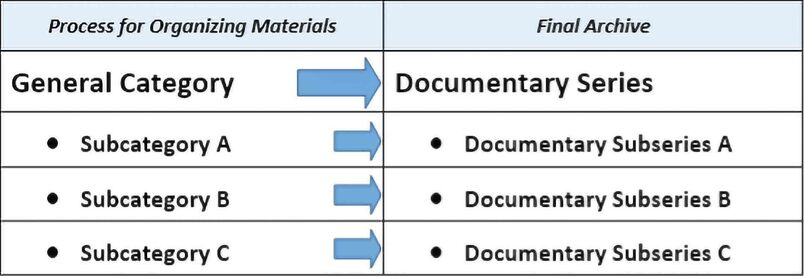
Subcategories or subseries are smaller, more specific groupings of documents and materials. Not all general categories or series necessarily include subcategories or subseries, but their use allows for the more detailed organization of a general category.
To facilitate the identification of subcategories, it is important that team members pay attention to the types of documents they come across when they review them, noting the most striking characteristics of each. If the team identifies subcategories within a general category and decides to use them, it will place each of the documents of the general category into only one of the identified subcategories. Additional boxes can be used to separate documents and materials for each subcategory. A miscellaneous subcategory can also be provided for all documents in a general category that do not fall into one of the subcategories identified by the team.

For example, within the documentary series “Training and Education Area,” there may be subseries such as “Seminars,” “Workshops,” or “Training Camps.” The “Seminars” subseries could be organized in chronological order for each seminar organized and carried out, from the oldest to the most recent, including documents such as announcements and other means of publicity for the event, participant lists, presentations, photographs, flipcharts, notes, minutes and reports, as well as budgets, tenders, and financial reports related to each event.
The subseries of the “Training and Education Area” series could also be organized according to the topics taught in the various training events, such as “Human Rights,” “Indigenous Rights,” “Children’s Rights,” etc. This subseries would contain documents for each activity in which that topic was taught, in chronological order, from oldest to most recent.
It is up to the archive team to determine the most appropriate subseries for each documentary series in the archive. The series and subseries are the main classification instruments for the organization of the final archive. At this point of the process, the list of general categories becomes a list of documentary series and the subseries identified by the team are added to the list.
STEP NINE: MAKING AN INVENTORY FOR EACH DOCUMENTARY SERIES AND SUBSERIES
This step consists of preparing and completing an inventory form (see example below) for the documents previously organized into documentary series and subseries. In this step, team members will again work directly with the documentary series and subseries, one at a time, in order to describe the contents of each document, its physical state of conservation, and its date of preparation to properly situate it in the archive. At this point, a specific and definitive place is assigned to each document within the physical archive.
On the inventory form, the characteristics of each document are indicated. The form can be filled out by hand, on a sheet of paper divided into nine columns, or directly in an Excel spreadsheet. If many people are going through the documents but few computers are available, then we recommend using paper forms to start with. Then someone from the team can enter the information from the forms onto a single Excel spreadsheet.
It doesn’t matter whether the inventory process begins or ends with the Excel spreadsheet, but it is important to always keep at least two backup copies of the updated data. If paper forms are used, we recommend saving them, even after their contents have been transcribed onto an Excel spreadsheet.
The header of the inventory form indicates the name of the organization and the documentary series being processed. At this point, the inventory process returns to the order of priority of the documentary series and subseries that was determined previously.
As an example, the nine columns of the inventory form can include the following information:
1. The number of the box in which the document or material is stored;
2. The folder or packet number in which the document is located;
3. The documentary series to which the document belongs;
4. The documentary subseries to which the document belongs;
5. The date of preparation of the document;
6. The type of document, including the number of pages, if applicable;
7. A brief description or summary of the document’s content;
8. The state of preservation of the document;
9. Additional comments on the document.
Example of a handwritten inventory form
INVENTORY FORM
Historical Archive of the Coastal Human Rights Committee
Documentary series: Communications Area
| Box | Folder | Docu- mentary Series | Docu- mentary Sub- series | Date | Docu- ment Type | Brief Descrip- tion or Summary | Preser- vation Status | Com- ments |
| 1 | 1 | Communica- tions Area | Press releases | 19850711 | Complaint, 1 page | Kidnapping of three farmers from the coast | Good condition | Original and a copy |
| 1 | 1 | Communica- tions Area | Press releases | 19850712 | Declara- tion, 2 pages | Content of the meeting with the Attorney General | Good condition | Removed the rusty staple |
| 1 | 1 | Communica- tions Area | Press releases | 19850716 | Advertise- ment, 1 page | Call for a demon-
stration in front of the Congress |
Good con- dition, but oxidation spots from the staple | Removed the rusty staple |
| 1 | 1 | Communica- tions Area | Press releases | 19850714 | Declara- tion, 2 pages | Declaration of the occu- pants of the Cathedral | Poor condition and missing second page | |
| 2 | 2 | Communica- tions Area | Newsreel recordings | 19850815 | Video cassette, 14 min. | Channel 7 newscast, interview with director López | The volume is very low | Find out how to digitize the video |
| 2 | 3 | Communica- tions Area | Fishermen Interviews | 19850817 | Audio cassette, 87 min. | Case of fish- ermen raiding the port | Bad, damaged by moisture | Inaudible |
The same form in an Excel spreadsheet:
| A | B | C | D | E | F | G | H | I | |
| 1 | Box | Folder | Docu- mentary Series | Docu- mentary Sub- series | Date | Docu- ment Type | Brief De- scription or Sum- mary | State of Preser- vation | Com- ments |
| 2 | 1 | 1 | Com- muni- cations Area | Press releases | 19850711 | Com- plaint, 1 page | Kidnap- ping of three farmers from the coast | Good condition | Original and a copy |
| 3 | 1 | 1 | Com- muni- cations Area | Press releases | 19850712 | Decla- ration, 2
pages |
Content of the meeting with the Attorney General | Good condition | Re- moved the rusty staple |
| 4 | 1 | 1 | Com- muni- cations Area | Press releases | 19850716 | Adver- tise- ment, 1 page | Call for a demon- stration in front of the Con- gress | Good condi- tion, but oxidation spots from the staple | Re- moved the rusty staple |
| 5 | 1 | 1 | Com- muni- cations Area | Press releases | 19850714 | Decla- ration, 2
pages |
Declara- tion of the oc- cupants of the Cathedral | Poor condi- tion and missing second page | |
| 6 | 2 | 2 | Com- muni- cations Area | news- reel record- ings | 19850815 | Video cas- sette, 14 min. | Channel 7 newscast, interview with director López | The volume is very low | Find out how to digitize the video |
| 7 | 2 | 3 | Com- muni- cations Area | Fish- ermen Inter- views | 19850817 | Audio cas- sette, 87 min. | Case of fishermen raiding the port | Bad, damaged by mois- ture | Inaudi- ble |
Regarding the column “State of Preservation,” it is simply a matter of making an intuitive assessment of the state of conservation of each document based on its appearance. Some specific detail can be given, such as “possible fungus,” or it can simply refer to the general condition of the piece in terms of it being in “good condition” or “poor condition.”
It is important at this point to give a definitive order to the documentary series and that each document of each subseries is organized according to the order decided on by the team, whether it is chronological, thematic, or alphabetical. To correctly locate a particular document in the future in its folder or packet and in its box, the final organization must be reflected in the inventory. Going forward, the inventory will serve as the primary tool to locate any document in the physical archive.
STEP TEN: BASIC TREATMENT FOR THE PRESERVATION OF DOCUMENTS
As a counterpart to the previous step of inventory and the final organization of the archive into documentary series and subseries, in this tenth and last step of the process, documents are given basic treatment with the aim of ensuring their preservation and future digitization.
We recommend turning off fans during the document cleaning process so as not to spread dust and dirt from the documents, especially spores or fungi. As in the previous steps, staff responsible for carrying out treatment measures must ensure that they wear all the necessary protective equipment.
In this step, all metal elements prone to rust, such as staples, clamps, and clips are removed from the paper documents. Plastic elements, such as folders or acetate envelopes, should also be eliminated. Staples can be removed with a letter opener or lab spatula, always taking care not to tear the document and to properly dispose of recovered metal materials.
For the removal of staples in particular, the use of a staple remover is not recommended, since the pliers pull out the staples instead of carefully removing them, thus easily tearing the paper. With the lab spatula, unfold the two ends of the staple on the back of the sheet, turn the sheet over, and lift the staple out without damaging the document.

After removing the staples, clamps or clips, both sides of the pages of each document must be cleaned using a dry brush with soft, natural bristles, always sweeping from the inside out and frequently clearing away dust particles and dirt from worktables and floors.

Once clean, if you need to refasten the pages of a document, we recommend using a plastic clip (not metal) placed on top of a piece of acid-free 3 cm x 6 cm bond paper folded over the first and last pages of the document in such a way that the clip does not come into direct contact with the original. Although stainless steel staples exist, they can be very expensive, and when documents are digitized in the future, it will be necessary to remove them again, once more compromising the integrity of the paper.
When each document of a subseries has been organized, they can be separated from the preceding and subsequent documents with a full sheet of acid-free bond paper. In this situation, a plastic clip to hold the pages of a document together is unnecessary, as the documents are separated by sheets of bond paper, one before the first page and one following the last page of each document.
For example, multiple-page press releases from the “Press Releases” subseries of the “Communications Area” series can have a sheet of bond paper between each one. In this way, each press release is separated without using plastic clips. Multiple press releases, arranged in chronological order by date, can be bundled together in packets. You can place a piece of chipboard or posterboard on top of the packet and another below, then each packet is tied with one-centimeter-wide twill tape.
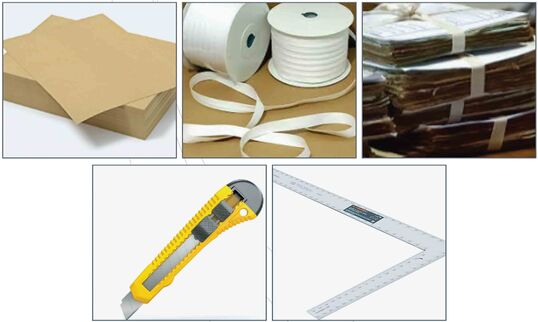
Materials other than stapled paper documents, such as notebooks, logs or newspapers, can be packed using acid-free sheets of paper, as illustrated below:
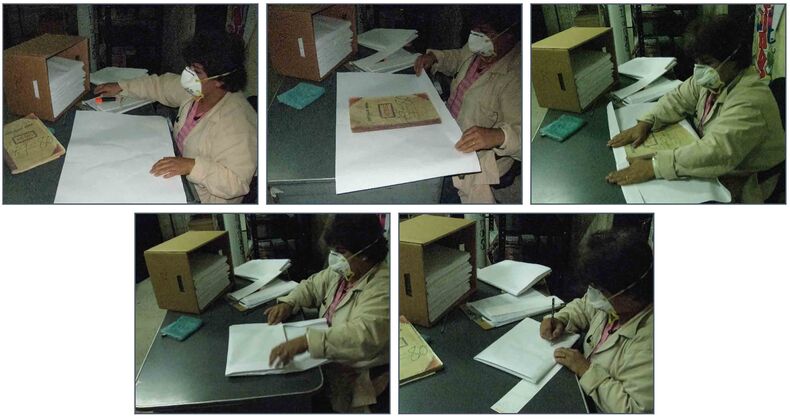
The same procedure can be applied to materials such as photographs, using chipboard or posterboard between each one and then packing several photographs inside a folded sheet of acid-free paper. Another alternative, in the event that the documents and materials are still being consulted or used on a regular basis, is tož use legal-size manila folders to group documents in the same subseries.

Note: all packets, packages, and manila folders must be individually identified in pencil and their characteristics and contents recorded on the inventory form.
Also, the sheets of bond paper used to separate documents and the chipboard or posterboard used to protect the packets of documents tied with twill tape must be the same size as the original documents.
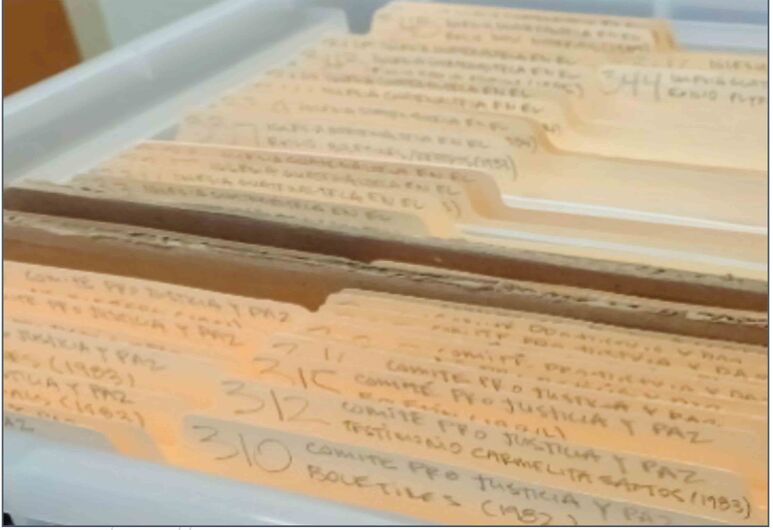
As mentioned in step seven, all handwritten notes related to the documents should appear not on the original documents, but on the sheets of acid-free bond paper or on the archival folders that protect the originals.
At the end of the process, all the documents should be kept in boxes with lids and identified with a label that indicates the name of the archival collection, the documentary series, the documentary subseries, the consecutive number of the box, the bookend years of the documents and materials in the box, a brief description of their content, and their general state of preservation.
Below is an example of the information needed on a box’s final label:

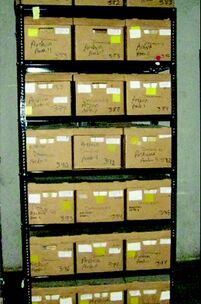
After the 10 steps have been completed, the organization’s physical archive should look similar to the photograph to the left.
Finally, to the extent possible, the ambient conditions inside the physical archive room should be kept stable, controlling humidity, direct light, temperature, and dust.
The ideal temperature for paper is between 15° and 20°C. The ideal relative humidity should be between 45% and 60%, with a maximum daily fluctuation of 5%. The use of a hygrometer is recommended to conduct periodic measurements of the humidity.
It is also important to ensure that there are no sudden variations in temperature, as this can accelerate damage to archival documents and materials. If an air conditioner is installed, for example, it must be kept on 24/7 at the same temperature, as turning the unit on and off can cause abrupt changes in temperature that may accelerate document deterioration.